

How To Add Photo To Mailchimp Template
For the sake of styling in MailChimp, the text content block provides a lot of flexibility. Insert written information and references, and then, if required, apply various font styles and adjustments. Across all of your text, you can also have images. You can wrap text over an image in MailChimp and improve the interface. To do that, add the image to a block of text material and choose its orientation.
- Things to Remember Before You Start
- Insert an Image and Wrap Text
- Conclusion
MailChimp has an outstanding range of support files in support of how to incorporate images and text into an email campaign. Here you will discover how to wrap text in MailChimp to wrap text across an image.
Things to Remember Before You Start
Before you initiate the process, here are a few things to remember:
- Use tiny images with a size of 100-300px to guarantee your campaign shows as anticipated.
- You can only wrap text around an icon in the Text, Boxed Text, or Footer content blocks in the drag-and-drop layouts. Pictures can be bundled into any content block containing an image and text with custom HTML layouts.
- After you wrap the text around a picture, make sure to test and evaluate your email campaign. Some email clients manage text wrapping differently from other email clients, including Outlook.
Insert an Image and Wrap Text
Follow the given steps to insert a picture into a text block and learn how to wrap text in MailChimp.
- In the Content section of the Campaign Builder, click Design Email.

- Select an existing content object at the Design stage or drag and drop a new content block into your layout.
- Click on the region of your content within the editing section where you want the picture to be placed.
- To select an image, tap on the Content Studio icon on the slider.

Follow these steps to choose your image according to your desires:
- If you want a picture that you had previously posted, simply click and insert it.
- If you want to upload a file from your computer, click on upload, then locate your file, and click on open.
- If you want an online image, save it first, then click on the drop-drop list and select the option "import from URL." Then click on the URL and import.
- Click on "Show image style options" from the edit picture screen.

- Click on the Align drop-down list to select whether to add your picture:
- In the middle of your text
- To the left
- To the right

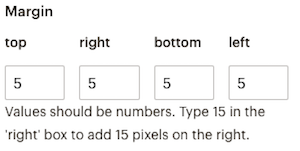
- In the Margin field, insert a number to provide space between the picture and wrapped text.
- Click on Save & Insert your Image.

Double-click the picture in the edit panel if you ever need to make specific picture settings or margins.
Conclusion
Images with wrapped text always give an eye-catching sight to the viewer. MailChimp also provides us with this attractive opportunity. Here's a complete guide on how to wrap text in MailChimp. You can use the technique mentioned above to wrap your text around your images. Choose the best alignment and create an attractive campaign for your audience.

Read our other comparisons:

Chief Editor at EmailTech.co and Watchtime.quest. Former Email Marketing Strategist & Growth at Airbnb.
Learn email marketing with my free email marketing course
How To Add Photo To Mailchimp Template
Source: https://emailtech.co/how-to-wrap-text-in-mailchimp/
Posted by: bryaninscurs.blogspot.com
0 Response to "How To Add Photo To Mailchimp Template"
Post a Comment